In both manufacturing and service industries, accurate measurement is a fundamental step toward delivering quality products and services. The cornerstone of this accuracy lies in the use of measuring devices. These devices play a pivotal role in ensuring that the specifications and standards required are met precisely.
Calibration is the practice that ensures the accuracy of these measuring devices. It’s a process that checks and adjusts the accuracy of a device, ensuring it performs as expected. Calibration is not a one-time task but an ongoing process, vital for maintaining the integrity and reliability of the measuring devices over their lifetime.
This article delves into the intricacies of measuring devices, shedding light on their importance in industrial settings. It further explores the critical aspect of calibration, elucidating why it’s essential and how it impacts the overall quality of products and services.
What is a Measuring Device?
A measuring device is an instrument used in manufacturing and service industries to assess various attributes of a product or component, such as its dimensions, temperature, pressure, etc.
Examples of Measuring Devices
The variety of measuring devices used in the manufacturing industry is extensive. Each device is crafted to measure specific attributes, ensuring that products meet the designated specifications. Here are some common measuring devices along with a brief description of their functionality:
- Caliper: Measures the distance between two opposite sides of an object.
- Micrometer: Offers highly precise measurements of small distances.
- Pin Gauge: Measures the diameter of holes.
- Height Gauge: Determines the height of objects or the difference in height between surfaces.
- Feeler Gauge: Measures gap widths.
- Pressure Gauge: Assesses the pressure of gases or liquids.
- Angle Gauge: Measures angles.
- Radius Gauge: Measures the radius of curved surfaces.
- Thermocouple: Measures temperature.
- Surface Plate: Provides a flat reference surface for inspections.
- Borescope: Allows for visual inspection in inaccessible areas.
- Torque Meter: Measures the torque on rotating systems like engines.
Each of these devices plays a unique role in ensuring the accurate measurement of various attributes, which is fundamental to achieving the desired quality in manufactured products.
Their usage spans across different stages of the manufacturing process, from the initial design and development stage through to the final inspection and quality assurance processes.
How Measuring Devices are Used in Manufacturing and Service Industries
The use of measuring devices is fundamental in manufacturing to ensure that the products meet the specified requirements.
Here’s a breakdown of the process using the example of verifying a hole depth as per a customer’s drawing:
- Customer drawing specifies a hole depth of 0.250 inches with a tolerance of +/- 0.005 inches.
- A depth gauge, specified to read depths from 0 to 150 inches with an accuracy of +/- 0.001 inches, is selected for this task.
- Ensure the depth gauge is calibrated to provide accurate measurements.
- The depth gauge is used to measure the hole depth.
- Measurement is taken and recorded.
- The recorded measurement is compared to the customer’s specified tolerance of 0.250 inches +/- 0.005 inches to verify compliance.
- The measurement, along with the details of the calibrated depth gauge used, is documented for future reference and quality assurance.
In this scenario, the calibrated depth gauge plays a crucial role in ensuring that the hole depth is within the specified tolerance. Accurate measurement is vital as it impacts the quality and functionality of the final product. It’s not only about measuring but measuring accurately, which is where the calibration of the device comes into play.
Why is Calibration of Measuring Devices Important?
Calibration is a pivotal aspect of maintaining the accuracy and reliability of measuring devices. When a device is initially purchased, it comes calibrated from the manufacturer with an expiration date.
This expiration date is a guideline indicating when the device should be recalibrated to ensure it continues to provide accurate measurements.
Consider a scenario involving a depth gauge for better understanding:
- The depth gauge is capable of measuring depths from 0 to 150 inches, with an accuracy of +/- 0.001 inches as per the manufacturer’s specification.
- When the device is initially purchased, it has been calibrated by the manufacturer to ensure its accuracy.
- Over time, various factors such as wear, drift, or mishandling can affect the accuracy of the device.
- Calibration is performed to compare the measurement device against a known standard, which is considered as the reference.
- During the calibration, the “as-found” condition of the device is recorded, identifying the measurement obtained when using a standard.
- If a device reads 0.259 inches while measuring a standard of 0.250 inches, it indicates a deviation of 0.009 inches. The device is then adjusted to align with the standard.
- This adjustment ensures that the device reads 0.250 inches when measuring the standard, thus bringing it back into specification.
The recalibration process, particularly the recording of the “as-found” condition, is crucial because it provides insight into the extent of deviation from the standard, if any. If a device is found to be out of tolerance, it could potentially impact the pass or fail criteria of the inspection result, which in turn could have implications on the quality of products.
This systematic calibration process underscores the necessity of regular calibration in maintaining the accuracy and reliability of measuring devices, which in turn significantly contributes to ensuring the quality of products.
Best Practices of Management of Measuring Devices
Management of measuring devices entails a set of practices aimed at ensuring that these tools are calibrated, maintained, and used correctly to guarantee accurate measurements. Here are some best practices:
Identification of Measuring Devices
Any device that could be used to measure should be clearly identified with either a calibration sticker or labeled as “for reference only.” When a measurement is required to verify a specification, standard, or drawing requirement, it is imperative that a calibrated device is used.
In addition, the calibrated device must not be expired or past the date it was expected to be re-calibrated. This practice ensures that only devices in good calibration status are utilized for critical measurements.
Inspection Points Identified with Details
Within a process router, traveler, or process, all inspection points should be clearly identified. This identification should include what needs to be inspected, the criteria for inspection, and the measuring device to be used. This practice ensures that the inspection process is carried out correctly and according to the specified guidelines.
Record the Actual Calibrated Devices Used at Every Inspection Point
It is crucial to record the specific calibrated devices used at each inspection point. This documentation provides traceability and can be extremely useful, especially if a device is later found to be out-of-specification.
Utilize Inspection Software
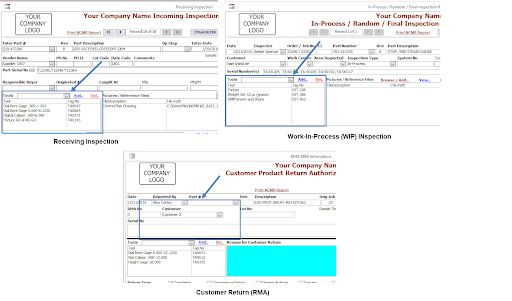
Employing inspection software within the Quality Management Suite can streamline the recording and tracking of all calibrated devices used during inspections.
This software can facilitate quick identification of the instruments used, whether during an incoming inspection, an in-process inspection, or a customer return (RMA).
Use Quality Management Software for Calibration
When the calibrated device goes through its scheduled calibration process, the first step is to determine the “as-found” condition of the device. Suppose the device is found to be “out-of-specification.” In that case, all measurements taken with this device are now questionable, and all products whose attributes here inspected by such device are subject to review.
Many businesses do not record the calibrated devices used to determine a passing outcome in an inspection process. How does a company identify the products that use “out-of-tolerance” devices? That list is required so they complete a due diligence process that determines whether or not the “as-found” condition would impact the end “passing” result of this inspection process.
Some may be able to go through inspection records, but that process is too time-consuming and doesn’t happen.
The Inspection Software within the Quality Management Suite, provided by Database Providers, has a location to identify all the calibrated devices used during the inspection. Inspectors can quickly identify the instruments used, whether an incoming inspection, an in-process inspection, or a customer return (RMA).

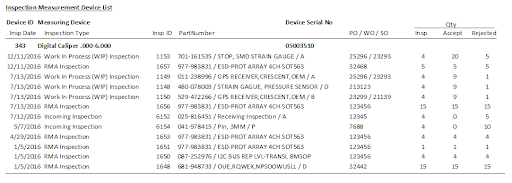
When a calibrated device has an “as-found” condition that is out-of-tolerance, a single-click operation reports the inspections completed since the last time the device was calibrated. An example of such a report is shown below.

Standards Used for Calibration Purposes
Calibration of measuring devices is a meticulous process that necessitates the use of standards. These standards serve as the reference against which the measurements of a device are compared. It’s imperative that the standards used for calibration are also calibrated to ensure their accuracy.
For a clearer understanding, consider the common practice of using a set of dowel pins for calibrating devices like digital calipers:
- A dowel pin set may consist of pins with diameters of 0.500, 1.000, 1.500, 2.500, and 5.00 inches.
- A digital caliper, which may have a range of 0 to 6 inches, can be calibrated using these dowel pins at specific intervals.
- The process involves measuring the dowel pins with the digital caliper to ensure it provides the correct readings at those specific intervals.
However, before using the dowel pins for calibration, it’s crucial to ensure that the pins themselves are accurately calibrated and within tolerance. This initial step of verifying the “as-found” condition of the standards is critical. If the standards are found to be out of tolerance, it could impact the accuracy of all devices calibrated using those standards.
The calibration of standards should be traceable back to industry-accepted national specifications, and they should have a documented calibration expiration date. This ensures that the standards remain reliable over time. If a standard is to be discarded, it’s essential to complete the initial step of recording the “as-found” condition to ensure they are within tolerance before discarding. If they are found to be out of tolerance, all devices that were calibrated using that standard are now suspect, and all of the inspections that occurred using such devices may need to be reviewed.
Conclusion
Managing measuring devices well is crucial for keeping up the quality in manufacturing and service jobs. Regular calibration makes sure these devices are accurate and meet industry standards.
This article showed how a structured approach to calibration and good management practices play a big part in improving product quality and making operations run smoothly. By using tools like the Calibration Management Software, companies can make the calibration process easier and ensure they continue to deliver top-notch products and services.
Ready to enhance the precision and reliability of your measuring devices?
Check out our Calibration Management Software offering tailored solutions that streamline the calibration process, ensuring optimal accuracy and efficiency in your operations.
Book a demo with us for a personalized showcase of how our software can revolutionize your quality control and calibration management.

